CSS Cheatsheet
What is CSS#
CSS, or Cascading Style Sheets, is a style sheet language used by web pages to help keep information in the proper display format. CSS helps beautify HTML and give it life.
Prerequisites: Knowledge in HTML, check out our article on HTML here
CSS Syntax#
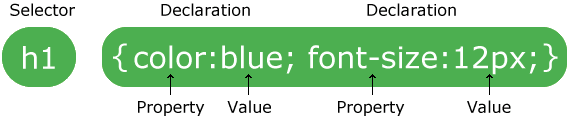
In this image, h1 is the selector and then there are 2 declarations
color: blue;font-size: 12px;
This sets the font-color to blue and then the font-size to 12px for all h1 tags
h1{
  color: blue;
  font-size: 12px;
}
CSS Selectors#
In CSS, we can use selectors to “find” various HTML elements to style. We’re going to look over selecting via element, id, class, and then grouping
Element Selector#
The element selector selects HTML elements based on the element name
ex: <p>, <h1>, <body> can all be selected with p, h1, body respectively
p {
    text-align: center;
    color: red;
}
All <p> elements on the page will be center-aligned, with a red text color
ID Selector#
The id selector selects HTML elements based off their id attribute. Note that the id of an element is unique, so the id selector is normally used to select one unique element.
Use the hash # to select ids.
#testID {
    text-align: right;
    color: blue;
}
This would apply to the HTML element with id="testID"
Class Selector#
The class selector selects HTML elements with specific class attributes. Note that classes do not need to be unique.
Use the period . to select classes
.testClass {
    text-align: left;
    color: black;
}
This would apply to all HTML elements with class="testClass"
We can also specify that only specific HTML elements should be affected by a class.
p.testClass {
    text-align: left;
    color: black;
}
Now, this would only apply to <p> elements with class="testClass"
Grouping Selectors#
We can use grouping selectors, or commas ,, to select multiple HTML elements with the same style definitions
h1 {
    color: red;
}

p {
    color: red;
}

h3 {
    color: red;
}
This code is redundant as it would be much better to group these selectors and minimize the code.
Here we use commas , to separate each selector
h1, p, h3 {
    color: red;
}
This would apply red text-color to all <h1>, <p>, and <h3> elements.
Check out this article
for more on CSS Selectors.
Linking#
There are 3 different ways to insert CSS
- External CSS
- Internal CSS
- Inline CSS
However, we’re only going to be looking at External CSS for now
External CSS#
With External CSS, we’re going to be linking a .css file into our HTML <head> section
<!DOCTYPE html>
<html>
    <head>
        <link rel="stylesheet" href="style.css">
    </head>
    <body>
        <h1>This is a heading</h1>
        <p>This is a paragraph.</p>
    </body>
</html>
We use a <link> with the properties rel="stylesheet" and href="style.css" to reference our style.css file.
If your CSS file is named differently, change style accordingly.
Your style.css file might look something like this:
body {
  background-color: lightblue;
}

h1 {
  color: navy;
  margin-left: 20px;
}
Check out this article
for more on linking CSS with HTML.
Comments#
Comments are used to help make code more readable, and are ignored by browsers.
In CSS, a single-line comment can be written like this:
/* Single-line comment example */
p {
    color: red;
}
and a multi-line comment can be written like this:
/* Multi-line
comment
examples */
p {
    color: red;
}
This is still a work in progress.
Created By: WHS Comp Sci Club Officers